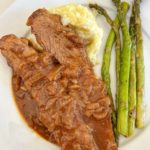
The Best Onion-Braised Beef Brisket
This Onion Braised Beef Brisket yields melt-in-your-mouth tender beef, smothered in an onion gravy that is loaded with delicious flavor. The brisket is slow braised the day before serving, that allows the flavors to build overnight. The next day, the fat is easily removed and the brisket is gently warmed in the oven, while the onion gravy is heated separately. Making this one day ahead made for less work in the kitchen, so I could enjoy our holiday dinner. Our guests loved this recipe as much as we did!
Servings 10
Equipment
- 1 12" Cast Iron Skillet I used a large cast iron Dutch oven
- 1 Baking Dish or large Dutch oven
- heavy duty aluminum foil
- kitchen tongs
- foil lined baking sheet to prevent spilling of braising liquid (which happened to me)!
Ingredients
- 1 beef brisket 4 to 5 pounds, flat cut preferred
- Salt and ground black pepper
- vegetable oil I prefer Avocado oil
- 3 large onions about 2 1/2 pounds, halved and sliced 1/2 inch thick
- 1 tablespoon brown sugar
- 3 medium cloves garlic minced or pressed through garlic press (about 1 tablespoon)
- 1 tablespoon tomato paste
- 1 tablespoon paprika
- ⅛ teaspoon cayenne pepper double if you prefer a spicier sauce
- 2 tablespoons all-purpose flour
- 1 cup low-sodium chicken broth
- 1 cup dry red wine
- 3 bay leaves
- 3 sprigs fresh thyme
Garnish before serving:
- 2 teaspoons cider vinegar to season sauce before serving
Instructions
- Adjust oven rack to lower-middle position; heat oven to 300 degrees. Line 13 by 9-inch baking dish with two 24-inch-long sheets of 18-inch-wide heavy-duty foil, positioning sheets perpendicular to each other and allowing excess foil to extend beyond edges of pan. Pat brisket dry with paper towels. Place brisket fat side up on cutting board; using dinner fork, poke holes in meat through fat layer about 1 inch apart. Season both sides of brisket liberally with salt and pepper.
Sear the brisket:
- Heat 1 teaspoon oil in 12-inch skillet, or large Dutch Oven, over medium-high heat until oil just begins to smoke. Place brisket fat side up in skillet (brisket may climb up sides of skillet); weight brisket with heavy Dutch oven or cast-iron skillet and cook until well browned, about 7 minutes. Remove Dutch oven; using tongs, flip brisket and cook on second side without weight until well browned, about 7 minutes longer. Transfer brisket to platter.
Cook onions and prepare braising liquid:
- Pour off all but 1 tablespoon fat from pan (or, if brisket was lean, add enough oil to fat in skillet to equal 1 tablespoon).Stir in onions, sugar, and 1/4 teaspoon salt and cook over medium-high heat, stirring occasionally, until onions are softened and golden, 10 to 12 minutes. Add garlic and cook, stirring frequently, until fragrant, about 1 minute.Add tomato paste and cook, stirring to combine, until paste darkens, about 2 minutes. Add paprika and cayenne and cook, stirring constantly, until fragrant, about 1 minute. Sprinkle flour over onions and cook, stirring constantly, until well combined, about 2 minutes. Add broth, wine, bay, and thyme, stirring to scrape up browned bits from pan; bring to simmer and simmer about 5 minutes to fully thicken.
Oven steps:
- Pour sauce and onions into foil-lined baking dish. Nestle brisket, fat side up, in sauce and onions. Fold foil extensions over and seal (do not tightly crimp foil because foil must later be opened to test for doneness). NOTE: I recommend placing the baking dish on a baking sheet, as the juices overflowed in my oven, a bit. What a mess!Place in oven and cook until fork can be inserted into and removed from center of brisket with no resistance, 3 1/2 to 4 hours (when testing for doneness, open foil with caution as contents will be steaming). Carefully open foil and let brisket cool at room temperature for 20 to 30 minutes.
Final steps for the day before:
- Transfer brisket to large bowl; set mesh strainer over bowl and strain sauce over brisket. Discard bay and thyme from onions and transfer onions to small bowl. Cover both bowls with plastic wrap, cut vents in plastic with paring knife, and refrigerate overnight.
The next day:
- About 45 minutes before serving, adjust oven rack to lower-middle position; heat oven to 350 degrees. While oven heats, transfer cold brisket to cutting board. Scrape off and discard any congealed fat from sauce, then transfer sauce to medium saucepan and heat over medium heat until warm, skimming any fat on surface with wide shallow spoon (you should have about 2 cups sauce without onions; if necessary, simmer sauce over medium-high heat until reduced to 2 cups). While sauce heats, use chef's, electric knife or carving knife to slice brisket against grain into 1/4-inch-thick slices, trimming and discarding any excess fat, if desired. Place slices in 13 by 9-inch baking dish. Stir reserved onions and vinegar into warmed sauce and adjust seasoning with salt and pepper. Pour sauce over brisket slices, cover baking dish with foil, and bake until heated through, 25 to 30 minutes. Serve immediately.
To Make and Serve the Brisket on the Same Day:
- To Make and Serve the Brisket on the Same Day: If you would like to make and serve the brisket on the same day, after removing the brisket from the oven, reseal the foil and let the brisket stand at room temperature for an hour. Then transfer the brisket to a cutting board and continue with the recipe to strain, defat, and reheat the sauce and slice the meat; because the brisket will still be hot, there will be no need to put it back into the oven once the reheated sauce is poured over it.
Notes
Recipe source: Cook's Illustrated January/February 2005
Notes from America's Test Kitchen: This recipe requires a few hours of unattended cooking. It also requires advance preparation. After cooking, the brisket must stand overnight in the braising liquid that later becomes the sauce; this helps to keep the brisket moist and flavorful. Defatting the sauce is essential. If the fat has congealed into a layer on top of the sauce, it can be easily removed while cold. Sometimes, however, fragments of solid fat are dispersed throughout the sauce; in this case, the sauce should be skimmed of fat after reheating. If you prefer a spicy sauce, increase the amount of cayenne to 1/4 teaspoon. You will need 18-inch-wide heavy-duty foil for this recipe. If you own an electric knife, it will make easy work of slicing the cold brisket. Good accompaniments to braised brisket include mashed potatoes and egg noodles. For a Passover menu, substitute matzo meal or potato starch for the flour.