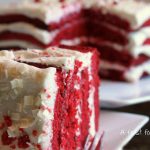
Red Velvet Cake with White Chocolate Frosting
This Red Velvet Cake with White Chocolate Frosting is a show stopping dessert! Red Velvet Cake is such an iconic and beautiful dessert. Buttermilk and vegetable oil makes this cake batter very moist and tender. The frosting is a more traditional one, made with cooked milk and flour. Once cooled, it's whipped in to softened butter and granulated sugar. Like magic, the frosting is transformed into a fluffy whipped-cream texture. The addition of melted white chocolate is a unique twist on a more common Cream Cheese frosting.
Servings 12 servings
Equipment
- 1 serrated knife for better ease of slicing layers and trimming cake
- 1 off set spatula for frosting cake
- 1 piping bag and large round tip for piping in edges of frosting
- 1 large cake spatula for less risk in transferring cake layers
Ingredients
CAKE:
- 1 1/2 cups all-purpose flour
- 1 1/4 cups cake flour
- 1/4 cup unsweetened cocoa powder
- 1 teaspoon baking soda
- 1 teaspoon table salt
- 1 teaspoon instant espresso powder
- 2 1/4 cups sugar
- 3 eggs
- 2 1/4 cups vegetable oil
- 1 2/3 cups buttermilk
- 1 ounce liquid red food color
- 1 teaspoon vanilla extract
- 1 tablespoon distilled white vinegar
FROSTING:
- 2 cups whole milk
- 1 1/2 cups all-purpose flour
- 4 ounces quality white chocolate bar chopped
- 2 cups granulated sugar
- 2 sticks unsalted butter softened
FROSTING GARNISH:
- Additional white chocolate bar optional
Instructions
- Preheat the oven to 375°F
- Line bottoms of two 8x8x2-inch square pans (or three 9x2-inch round cake pans) with parchment paper and coat with non-stick spray. Note: I use Baker's Joy spray and my cakes never stick!
Cake:
- Sift together the flours unsweetened cocoa powder, baking soda, table salt and instant espresso powder; whisk to combine. Set aside.
- TIP: For less mess, in a large glass measuring cup with a pour spout, combine the buttermilk, food color and vanilla before mixing into the cake batter.
- Beat sugar and eggs in a large bowl with a mixer on high speed until white, thick and creamy for 5 to 7 minutes. With the mixer on low speed, slowly drizzle in the oil until it is full incorporated.
- Alternately add the flour mixture and the buttermilk mixture to the batter (starting and ending with flour mixture) until combined.
- Mix vinegar into batter and immediately divide evenly between prepared pans.
- Bake cakes until a toothpick comes out clean, about 35 to 40 minutes. Transfer cakes to a wire rack to cool, for about 10 minutes. Turn cakes out of pans and cool on racks. Once cooled, peel away parchment.
- Slice each cake in half horizontally to form 4 layers. Note: My cakes were baked square, so I trimmed off the edges to reveal the red cake color. Save the crumbs for later, to crumble and sprinkle on top as decoration.
White chocolate frosting:
- Whisk milk and flour together in a saucepan over medium heat, stirring constantly with a rubber spatula, until thick and paste-like and no longer lumpy, about 15 minutes. Note: Don't panic if it becomes lumpy, as you can always push it thrown a fine sieve. However, keep stirring and scraping the pan at all times.
- Transfer mixture to a bowl, press plastic wrap over the surface to prevent a skin from forming and chill until cold.
- Melt chocolate in a double-boiler (I had thin chocolate, so I melted it in 30 second intervals in my microwave). Cool slightly.
- Cream sugar and butter in the bowl of a stand mixer on high (I use my Kitchen Aid Whisk Attachment)) for about 7 minutes, until it is light and fluffy.
- Add chilled milk mixture and melted chocolate and beat on high speed until light and fluffy, about 5 minutes more.
- Note: I added 1 teaspoon additional vanilla, as I felt it really needed it. I also think an additional 4 ounces of melted white chocolate would be more noticeable. Of course, I love white chocolate!
Assembly:
- With a serrated knife, level each layer if the center is a high dome (like one of mine was). Split each layer in half. Turn the first layer upside down onto your serving platter (I place narrow strips of wax paper along each edge to catch frosting drippings). Fill the piping bag and pipe the frosting onto the edge of each layer. Plop some frosting in the center, and evenly spread with an off-set spatula. (We aren't frosting the sides of the cake, because this is makes a beautiful presentation.
- Note: Before adding the final layer, add cut wooden dowels at each corner and in the center. I didn't do this, so my cake leaned a bit!
- Repeat with each layer. If desired, sprinkle some fine red crumbs and/or shave some additional white chocolate with a vegetable peeler and sprinkled on top.
- Note: The frosting is very much liked whipped cream. Therefore, the cake could be in danger of sliding (if you haven't used wooden dowels). Freeze (or refrigerate the cake, immediately) for about 15 minutes, and that should stabilize it. Allow to come to room temperature for 15 to 30 minutes before slicing.
- Slice with either an electric serrated knife, or a regular serrated knife. This prevents the layers from becoming "squashed".
Notes
This recipe is slightly adapted from Cuisine At Home Magazine (December 2011).