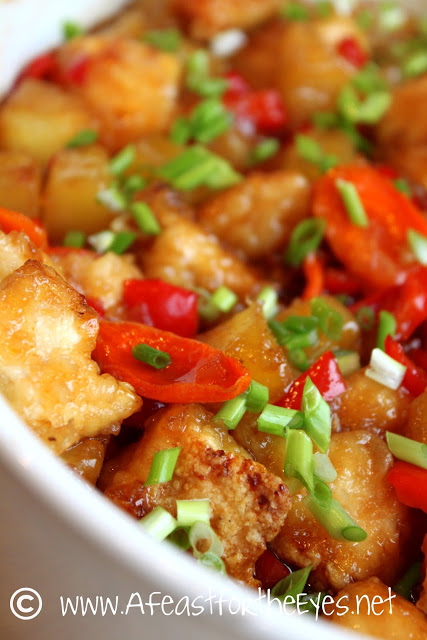
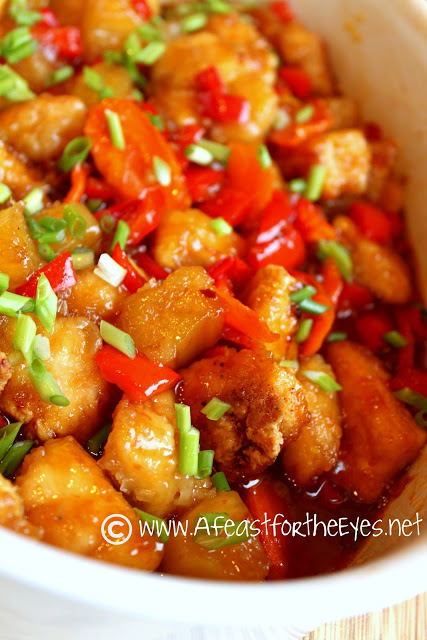
This Baked Sweet and Sour Chicken tastes just as good (if not better) than the deep-fried version from your local Chinese takeout. You get the crispy crust, and the sauce has the perfect balance of sweet and sour. There’s a little bit of vegetable prep for the carrots, onions and bell pepper. Once the dish is in the oven, you can tidy up the kitchen and make rice. We love this recipe!
The inside of our garage upright freezer was starting to resemble Antarctica, so it was time to do some defrosting and rearranging. I found a package of chicken breasts that was hidden behind a big chunk of ice. Rummaging through my pantry and discovered a can of pineapple chunks. Red bell peppers are a staple in our fridge.
My husband says that I cook by what I am craving. Yep, that’s very true. I like Chinese food every once in a while, but there aren’t very good Chinese restaurants close by. That’s my craving radar kicked in– Sweet and Sour Chicken!
I don’t want to mislead anyone into believing there isn’t any frying involved, because, well… there is! Cut-up chicken is coated with egg and then tossed with seasoned flour, then in a seasoned cornstarch mixture, fried in oil just long enough to brown, but not cook all the way through.
Before baking, the chicken is coated with sauce. Sauce? I apologize that I don’t have any photos to show you. I just wasn’t sure if I’d like this recipe and I was feeling kind of lazy (I’ve made a few not-so-good sweet and sour recipes before) so I didn’t set up my camera. Anyway… the sauce doesn’t have any unusual ingredients– pineapple juice, red wine vinegar, ketchup, powdered ginger (I would have used fresh if I had any), and a few other tidbits (printable recipe is at the end of this post).
NOTE: I found that the sauce didn’t quite thicken, to my liking. No worries. I carefully drained out the thin sauce into a saucepan and added a slurry of cornstarch and water (about 1 heaping tablespoon and enough water to whisk until there were no lumps and it was smooth). That did the trick, and I poured it all over the chicken and it was perfect.
I served this with rice and then we sat down to enjoy dinner, about an hour and a half, after I began prepping and cooking. This isn’t exactly a fast meal to put on the table, but it’s pretty straight-forward to make.
TASTING NOTES: This is, seriously, the best homemade sweet and sour chicken that I’ve ever tasted. Even my husband praised how much he loved this dish. If there is anything I would change (and I’ve noted this on the recipe card) is to cut back a wee bit on the red wine vinegar. The sauce had a bit of a tart bite to it, but it was still very good. Before anyone asks, let me try and guess some questions that might come my way.
Can you use dark meat? I would suppose you could, but I’ve always had white meat with my sweet and sour chicken at Chinese restaurants.
Can you use a different type of vinegar, like white wine or rice vinegar? It’s worth a try, but I’ll stick with red wine vinegar for the flavor and the color. I used only red bell pepper because I like the sweetness and color of them. Feel free to use a combination of green bell peppers– whatever floats your boat. Next time, I think I’ll cut the bell peppers a bit chunkier.
Just today, my husband mentioned how much he liked this dish. So, I’ll take that as reassurance that I’ll definitely make this again. When I do, I’ll take more step-by-step photos and update this post. It’s pretty easy to make. Really!
Chinese Fakeout: Baked Sweet and Sour Chicken
Ingredients
CHICKEN BREADING:
- 3 to 4 boneless skinless chicken breasts (1 1/2 pounds, cut in bite-size pieces)
- 3 eggs I used two
- 1/2 cup flour
CORNSTARCH MIXTURE:
- 1 1/3 cup cornstarch
- 1/2 teaspoon garlic powder
- 1/2 teaspoon salt
- 1/4 teaspoon pepper
- 1/4 teaspoon ginger powder
- 1/4 teaspoon onion powder
SWEET AND SOUR SAUCE:
- 1/2 cup pineapple juice from 20 ounce pineapple tidbits can below
- 1 cup red wine vinegar reduce to 3/4 cup
- 1 1/2 cups sugar
- 1/4 cup + 2 tablespoons ketchup 6-tablespoons
- 1 small onion diced
- 2 tablespoons soy sauce
- 4 cloves garlic minced
- 1 teaspoon salt
- 1/2 teaspoon red pepper flakes
- 1/2 teaspoon ginger powder
VEGETABLE/PINEAPPLES:
- 1 20-ounce can pineapple tidbits
- 1 green bell pepper chopped (we prefer larger chunks and all red bell pepper)
- 1 red bell pepper chopped
- 1 cup carrots sliced as THIN as possible (2 to 3 carrots)
Instructions
Sweet and Sour Sauce:
- Add "Sweet and Sour Sauce" ingredients to a medium/large saucepan, stir and bring to a boil then reduce to a gentle simmer. Allow to simmer while you prepare the chicken and dice the vegetables, stirring occasionally (turn off if longer than 20 minutes).Note: the sauce will not thicken, simmering is to soften the onions and blend flavors.
- Preheat oven to 350°F and lightly grease a 9×13- inch baking dish with non-stick cooking spray.
Coat the chicken:
- Whisk eggs together in a large bowl, set aside.
- Add 1/2 cup flour to a large freezer bag; set aside next to eggs.
- Whisk cornstarch, garlic powder, salt, pepper, ginger powder and onion powder in medium bowl; set aside next to flour.
- Add chicken to eggs and coat, then remove, allowing excess to drip off, then add to freezer bag with flour.
- Toss until evenly coated then discard any extra flour.
- Add cornstarch/spices to the chicken in the freezer bag and shake until evenly coated.
Cook the chicken:
- Over high heat, heat enough oil (any kind) to generously cover the bottom of a large skillet until hot and rippling.
- Add chicken and cook 1-2 minutes per side, or until browned but not cooked through. (You may need to cook in 2 batches depending on size of your skillet). Transfer chicken to prepared 9×13-inch baking dish.
- Add carrots pineapple and peppers to the sweet and sauce and mix until well combined.
- Pour sauce over chicken and stir until sauce/chicken/vegetables are evenly combined. Cook, uncovered for 50 minutes or until sauce is thickened*, stirring occasionally.
Notes
my liking. No worries. I carefully drained out the thin sauce into a
saucepan and added a slurry of cornstarch and water (about 1 heaping
tablespoon and enough water to whisk until there were no lumps and it
was smooth). That did the trick, and I poured it all over the chicken
and it was perfect. RECIPE SOURCE: “Carlsbad Cravings“






Looks and sounds delicious Debbie – I like the bright colors in it.
This does sound good and I'm sure much better than takeout Chinese.