How to Make Homemade Chocolate Dipped Peppermint Marshmallows
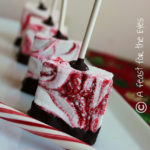
Homemade Marshmallows are not difficult to make. These Chocolate Dipped Peppermint Marshmallows were perfect for the holidays, and made great gifts. Homemade Marshmallows taste so much better than the commercially made ones. Best of all, you can adapt the recipe with a variety of flavors. Have fun with it!
Servings 24 marshmallows
Equipment
- 24 cake pop sticks
- 1 9 x13-inch pan preferably a metal baking pan that doesn't have round corners
- wax paper and aluminum foil
- 1 sifter for powdered sugar
- 1 stand mixer with wire whisk attachment or a hand-mixer
- Non-stick spray
- 1 candy thermometer
- very sharp knife or pizza cutter
Ingredients
- 3 0.25-ounce packages unflavored gelatin
- 1 cup ice cold water divided
- 1 1/2 cups granulated sugar
- 1 cup light corn syrup
- 1/4 teaspoon kosher salt
- 1 teaspoon vanilla extract
- 1 teaspoon pure peppermint extract
- 1/2 cup confectioners' sugar
- red food coloring
- nonstick spray
- 4 to 6- ounces quality dark chocolate chopped, optional
Instructions
- Lightly spray a 13x9-inch metal baking pan with nonstick cooking spray. Sift the powdered sugar and completely coat the bottom and sides of the pan. Return the remaining sugar to the bowl for later use.
- Place the gelatin into the bowl of a stand mixer along with 1/2 cup of the water.
- In a small saucepan combine the remaining 1/2 cup water, granulated sugar, corn syrup and salt. Place over medium high heat, cover and allow to cook for 3 to 4 minutes.
- Uncover, clip a candy thermometer onto the side of the pan and continue to cook until the mixture reaches 240°F, approximately 7 to 8 minutes. Once the mixture reaches this temperature, immediately remove from the heat.
- Turn the mixer on low speed and, while running, slowly pour the sugar syrup down the side of the bowl into the gelatin mixture. Once you have added all of the syrup, increase the speed to high. Continue to whip until the mixture becomes very thick and is lukewarm, approximately 12 to 15 minutes.
- Add the vanilla and peppermint extract during the last minute of whipping. While the mixture is whipping prepare the pans.
- When ready, pour the mixture into the prepared pan, using a lightly oiled (or baking spray) off-set (or regular) spatula for spreading evenly into the pan.
- If adding the red food color, add some random drops and then swirl with a toothpick.
- Dust the top with enough of the remaining powdered sugar to lightly cover. (Reserve the rest for later.)
- Cover the pan with foil and shake up, down and sideways. Allow the marshmallows to sit uncovered for at least 4 hours and up to overnight.
- To cut the marshmallows, I had great success with a very sharp knife, sprayed with non-stick spray.
- Turn the marshmallows out onto a cutting board, lightly dusted with powdered sugar. Cut into 1-inch squares using sharp knife, or pizza wheel dusted with confectioners' sugar mixture.
- Once cut, lightly dust all sides of each marshmallow with the remaining mixture, using additional if necessary.
- TIP: I cut strips of marshmallow, then placed them back into the baking pan, dusted with extra powdered sugar. I then gently pressed sugar on all of the freshly cut sides, so that they wouldn't be sticky. That technique worked great!
- Store in an airtight container for up to 3 weeks. I bagged a few marshmallows in a clear cellophane bag) and tied them with ribbon. They are perfect for hot chocolate.
TO COAT IN CHOCOLATE:
- Cut the chocolate into small chunks and place in a glass bowl, over a pot of simmering water. Do not let the bowl touch the water! Once melted, stir to smooth.
- Have a baking sheet, covered with wax paper on standby. If using cake pop sticks, dip the stick into the chocolate at about 1/4-inch deep. Carefully plunge the stick into the marshmallow. Dip the bottom of the marshmallow to coat the bottom and slightly up the side. Set on the wax paper.
- Allow the dipped marshmallows to set for at least at hour. I placed 2 to 3 marshmallows in tall cellophane bags and tied them with a ribbon.